9 Essential Steps to Designing Your Own Calculator CPU
Building a custom CPU from scratch might seem like a task reserved for large engineering teams, but a growing community of enthusiasts is proving otherwise. One standout project, from [Baltazar Studios], combines a self-designed CPU with a fully functional scientific calculator—all packed into a sleek 3D-printed case. Whether you're a hardware hacker or a calculator aficionado, this journey offers profound insights into architecture, optimization, and personal satisfaction. Below are nine key aspects that make this endeavor both challenging and rewarding, from choosing an FPGA to understanding why 4-bit nibbles are surprisingly powerful.
1. The Allure of a Custom CPU for Everyday Projects
Most people use off-the-shelf microcontrollers, but designing your own CPU gives you complete control over instruction sets, power consumption, and specialized operations. The [Baltazar Studios] calculator exemplifies this: its CPU is tailored for decimal math, not general-purpose computing. By rolling your own, you can eliminate unnecessary overhead and create a device that behaves exactly as you intend—a rarity in an age of bloated operating systems and app-laden smartphones.
2. FPGA Freedom – The Modern Semiconductor Playground
Field-programmable gate arrays (FPGAs) are the perfect medium for CPU experimentation. Unlike fixed silicon, FPGAs allow you to iterate on your design: change logic gates, tweak timing, and even add new instructions without ordering a custom chip. [Baltazar Studios] used an FPGA to implement their Harvard-architecture CPU, proving that you can move from simulation to a working calculator without breaking the bank. FPGAs also let you emulate vintage designs like HP’s classic calculators, bridging past and present.
3. Why Harvard Architecture? – A Lesson in Efficiency
The Harvard architecture separates program memory from data memory, offering simultaneous access that speeds up execution. For a calculator, this is ideal: one memory bus fetches the next instruction while another handles operand data. [Baltazar Studios] chose this approach alongside a 12-bit instruction set—compact enough for simple logic yet powerful enough for scientific functions. The trade-off is complexity in chip routing, but for a focused device like a calculator, the performance gain is well worth it.
4. The Curious Case of 4-Bit Nibbles
Why build a CPU with 12-bit instructions but operate on 4-bit nibbles? The answer lies in binary-coded decimal (BCD). Most calculators display numbers in decimal, and BCD stores each decimal digit in a 4-bit nibble, making conversion trivial. HP pioneered this technique in their calculators because it avoids rounding errors and simplifies display drivers. [Baltazar Studios] followed suit, proving that even a seemingly dated bit width can be elegantly efficient for the right application—no 32-bit bloat required.
5. Optimizing for Binary Coded Decimal (BCD)
Traditional binary arithmetic suffers from floating-point inaccuracies when handling decimals. BCD sidesteps this by encoding digits directly, allowing exact representation of fractions like 0.1. However, BCD addition requires special correction steps—adding 6 to any nibble that exceeds 9. A custom CPU can hardwire this logic, making each arithmetic instruction perform seamlessly. The [Baltazar Studios] design dedicates hardware resources to BCD, resulting in a calculator that displays precise results—just like the HP classics that inspired it.
6. Borrowing from HP’s Legacy – The Impact of Vintage Design
Hewlett-Packard’s scientific calculators from the 1970s and 1980s set the standard for accuracy and user experience. Their use of BCD and nibble-wide data paths directly influenced [Baltazar Studios]’ CPU. By studying old HP schematics and chip manuals, modern hobbyists can implement similar performance in a fraction of the silicon area. This retrospective engineering not only honors the past but also teaches fundamental trade-offs between hardware complexity and software simplicity.

7. From FPGA Logic to Physical Calculator
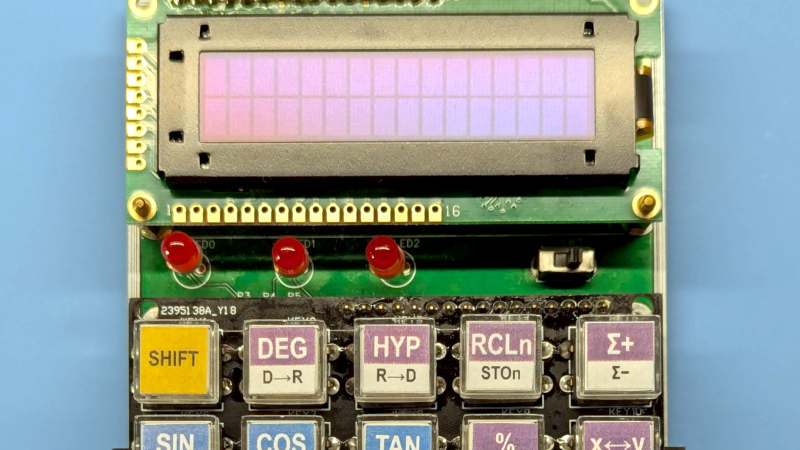
Once the CPU core works on an FPGA, the real fun begins: building the actual calculator. [Baltazar Studios] created a 3D-printed case with carefully designed button mechanisms and an OLED display that mimics the warm glow of a VFD. The interface uses a matrix keypad scanned by the CPU, with dedicated I/O pins. This step transforms a theoretical design into a tangible tool—one that you can hold, click, and rely on for your next math session. The build process also teaches PCB design, power management, and enclosure aesthetics.
8. Overcoming Debugging Challenges – The Importance of Simulation
No custom CPU works on the first try. [Baltazar Studios] likely spent hours debugging instruction decode, memory timing, and BCD correction logic. Using a VHDL or Verilog simulator, you can step through each clock cycle and observe register values. For a calculator, you must test every operation: addition, subtraction, trigonometry, and more. Simulation tools like GHDL or ModelSim are indispensable. They replicate the FPGA’s behavior before you load the design, saving weeks of soldering and frustration.
9. The Community Spirit – Inspiration from Flapulator and Beyond
The Hackaday community has always celebrated quirky, self-made hardware. Projects like the “Flapulator” (a playful calculator that flaps its wings) show that creativity is as important as technical skill. [Baltazar Studios]’ scientific calculator stands out because it marries an original CPU design with everyday usability. By sharing schematics, code, and 3D print files, these makers inspire others to start their own CPU journeys. You don’t need a fab lab—just an FPGA board, some patience, and a love for calculators that goes beyond a smartphone app.
Conclusion
Designing your own calculator CPU is more than a technical exercise; it’s a way to understand the foundations of computing. From choosing a Harvard architecture and nibble-wide data paths to implementing BCD and building a physical enclosure, each step teaches you about trade-offs and optimizations that modern CPUs hide. The [Baltazar Studios] project proves that with an FPGA, a little history, and a lot of passion, you can create a tool that is uniquely yours. So, why not start planning your own custom CPU today? Your perfect calculator awaits.